Designation of Parking Space – OLS Steps

Once all the unit titles have been set up in OLS as per the condominium plan the user must also register as many parking designation spaces, as designated by the plan, in the same packet as the condominium transform.  If you have not already created the transform in OLS please visit our OLS Transform Transactions page.

Comprehensive step-by-step OLS instructions can be found in our Parking Designation Interests Guide.

For more detailed information on parking redesignation visit our Redesignation of Parking Spaces page. If you are re-designating parking spaces currently designated on a condominium plan approved between 1995 and June 16th, 2014, a parking designation interest registered on the residential unit title that currently has the space designated on the plan will have to be done. That interest will then be amended such that it is attached to the residential unit receiving the benefit of the parking space.

If you are assigning parking spaces after first title has been raised please access our Designation of Parking Spaces page.

Step 1: COMPLETING FORM F.1

If the developer wants to designate parking spaces at the time titles are issued, the designations must be in written form and registered on titles. This can be done by completing the Designation of Parking form (Form F.1), which can be found in the regulations pursuant to the Act. The Queen's Printer provides access to all forms under the Act. These forms can be found here.

  • Add in the Residential Unit Number in accordance with the approved plan.
  • Designate the parking space or unit if the condominium development utilizes both types of parking.
  • Allocate parking spaces to each unit (i.e. p 1, p 2).
  • Save the completed Forms F.1 to your computer.

NOTE: If re-designating a parking space currently designated on a plan, the same Form D will be used as an attachment to the current residential title with the parking space designation, and once the interest is amendment to be attached to the title receiving the benefit of the space. See our Re-Designation of Parking Spaces page for more information.

Step 2: ADD PARKING DESIGNATION INTERESTS TO PACKET

 Once the condominium transform setups are completed and they have been validated, in OLS, do the following steps to add an interest application to register a parking designation interest.

A. Click the View Packet Content button at bottom of the Transforms application screen.


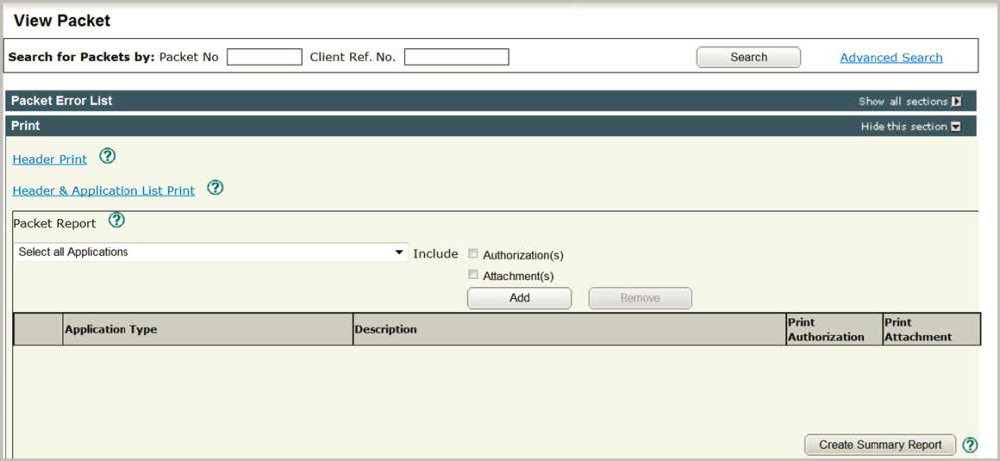
The View Packet screen will display. This is the overview of the packet that the user is currently working in. The user will be able to view the applications currently added to this packet.

The Select or Create Transaction for Packet xxxxxxxxx section of the Interest Transaction screen will display.


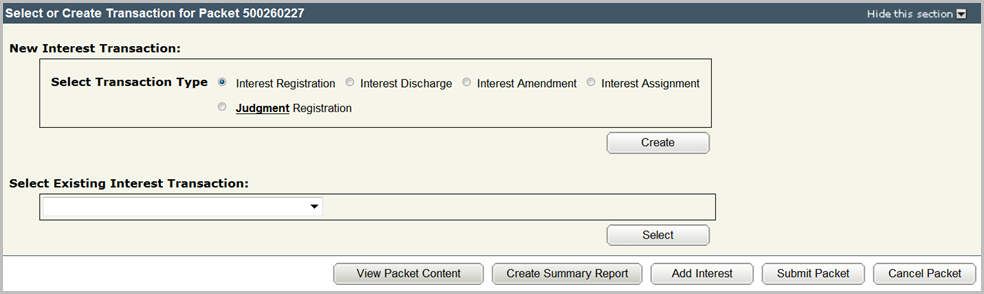
B. Click the Create button.

C. Enter information in the Interest Setup Description field (optional).

D. Choose the Condominium Property Act – Parking Designation interest from the Select Interest Type dropdown menu.

E. Enter the new parking space number as P then a space and one or more digits (e.g. P 11) in the Description of Interest.
 
F. Choose one of the following conditions:

    1. No Conditions;
    2. Free and Clear; or
    3. Conditional Registration

G. Scroll down to the Manage Authorizations and Attachments section. A completed Form F.1 from step 1 located in The Condominium Property Regulations, 2001 is required as an attachment for this interest type.

H. Attach the Form F.1. Click the New Upload button, in the Manage Authorization and Attachments section. Click the Browse button. Locate the Form F and Double-click on it. Click the Upload button.

I. Select the Attachment checkbox to link Form F.1 to the interest registration. The business rules require an attachment for this interest type. When the system validates the application it will look for an attachment to be linked to this transaction.  If it does not find an attachment an error message will be generated to alert the user.


J. Scroll down and click the Validate button. When there are multiple applications in one packet the user should validate on an application by application basis. If the business rules are met and the system does not locate any errors, a popup screen will display saying no errors or warnings s were encountered.

    1. Click the OK button. The user can continue to complete the application.
    2. If errors are found, a popup will display telling the user there are errors.

K. Click the OK button to see the errors in the application. Red error messages will display in the Validation Errors section of the application.


Note: the packet can still be rejected even though there may be no system errors in the application, as only the title processors can review documentation such as authorizations for completeness.

Step 3: ADD ANY ADDITIONAL INTERESTS

The user can add another parking designation interest to the same packet, once the user has validated the first parking designation interest.
  1. Click the Add Interest button at the bottom of the Interest Transactions screen.


A new Interest Transactions screen displays so that the user can complete the next parking designation interest using the steps outlined previously.
 
Keep adding an interest until each parking space has been attached to the appropriate condominium units.

Step 4: CREATE A SUMMARY REPORT (OPTIONAL)


A Summary Report is a report that shows you the work completed within one application or multiple applications of a particular packet.

A summary report should only be requested after validation has occurred and there are no errors contained in the packet.

To create a summary report for a one application packet, do the following steps:

A. Click the Create Summary Report button at the bottom of the screen.

B. Give the system a few minutes to generate the report and the report should display in the OLS Notifications area on the OLS Home page.

Note: a summary report, an application print request and a packet print request all refer to the same report within OLS.

Step 5: SUBMITTING THE PACKET

Once the packet has been validated and there are no errors, the user can submit the packet.

A. Select the Submit Packet button at the bottom of the OLS application screen. The Submit Packet confirmation screen will display. This page contains information from the Packet Header, the Packet Confirmation Date and the Estimated Fees for this packet.

B. Click the OK button to continue with the submission of the packet and once you have verified the accuracy of the information within the packet. Be sure you want to submit the packet before you select the OK button.

FORMER PROCESS

In the former process, parking space designations were recorded on the condominium plan.

If you are looking for parking designations that were completed prior to the changes to the Condominium Property Act, 1993 on June 16, 2014, please view the condominium plan since all parking spaces were originally designated on the plan and re-designations were also recorded. If you require further assistance, please contact our Customer Support Team.